How to create a new Lesson using the Presentation Component?
In this part of documentation, we will see how to create a new lesson using the Presentation component and adding other components into it. You will also learn how to update, remove and enrich your lessons using the Presentation component.
Presentation Component
Presentation is the basic component on which you can place other components. All your lessons using Sublime LMS ™ E-learning Components will be built on a Presentation. You can place almost all the other components on Presentations and navigate between each slide with the navigation buttons provided. Learners can experience new learning material and test their knowledge and memory in Presentations. Pages with the Responsive E-learning Components can be embedded seamlessly right into the Presentations for a richer learning experience.
Presentations enable you to author and deliver your course material directly in your browser. Presentations contain slides where you can add various multimedia - and interactive elements to engage the learner. Presentations are used when you want to package a piece of learning content in a structured and interactive format. Learners swipe through slides to experience the learning material, while solving various quizzes or watching videos along the way.
You can try Presentations as an alternative to presenting your learning content as PowerPoint Presentations, PDFs or text-based web pages. Presentations are very flexible to use, as they are simple to create, publish and edit.
You create a lesson using the Presentation component by following the below instructions.
Step 1: Click E-learning
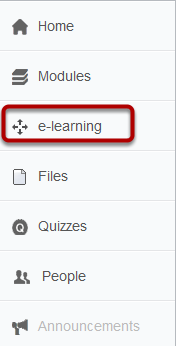
Click on the e-learning link found on the left side of your LMS environment as shown in the above image. You will see the below screen.
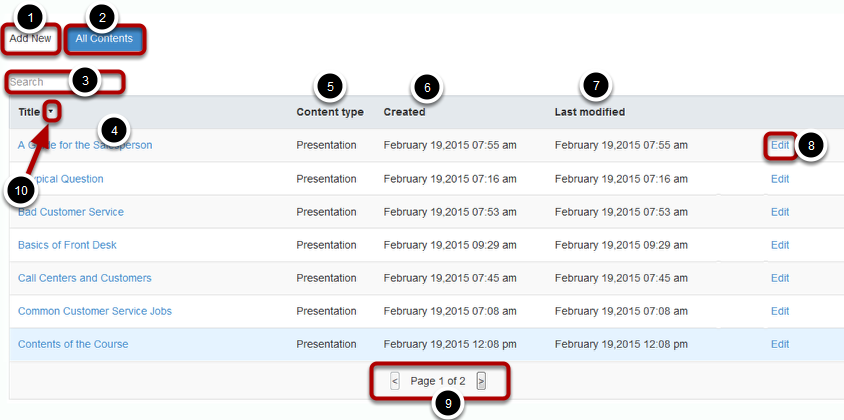
This screen lists all the lessons created so far. On this screen, you can
- Add New [1] button o add a new lesson.
- Click All Contents [2] button to view all the lessons on the screen at anytime.
- Type in the Search [3] bar to search for a specific lesson. The lessons will be listed automatically while you are typing in this field.
- Click on any lesson listed under Title [4] field to view that particular lesson.
- View the type of the content under Content type [5] title. Please note that we create all the lessons based on the Presentation component. So, this column will always be showing Presentation only.
- View the date the lesson was created on under Created [6] title.
- View the date the lesson was modified most recently under Last modified [7] title.
- Click the Edit [8] button to edit the lesson.
- Navigate between the index pages for all the lessons using the Navigation Buttons [9] at the bottom of the list.
- Sort the lessons ascending or descending by clicking the Sort [10] button next to any title in the list.
Step 2: Click Add New Button
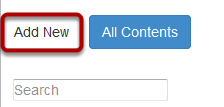
Click the Add New button as shown in the above image. You will see the below screen.
Step 3: Enter the Title of the Lesson
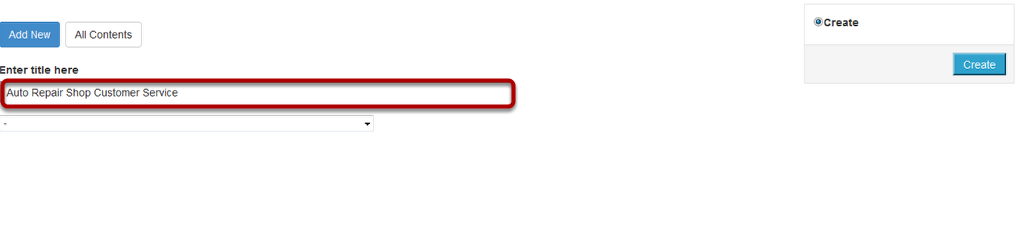
Update the lesson's title in the text field under Enter title here field as shown in the above image.

Since the title field is mandatory, you will get the above error message when you try to save the lesson without giving any title.
Step 4: Select Presentation from the Dropdown Box

Then click on the dropdown box shown in the above image. You will see the options shown in the below image.
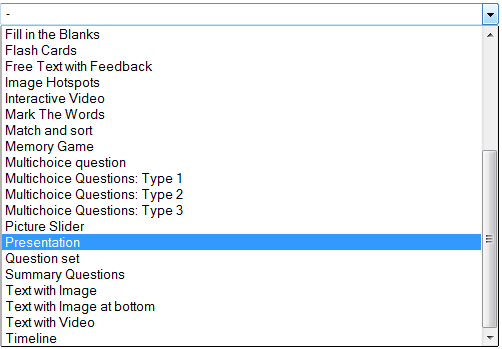
Click on the Presentation option from the dropdown box. You will see the below screen.
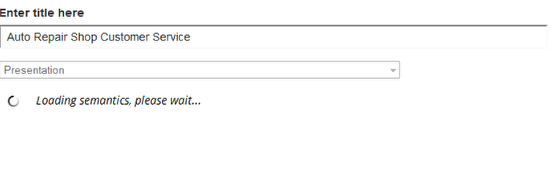
You can see the semantics being loaded into the page as shown in the above image. Once the semantics have been loaded, you will see the below screen.
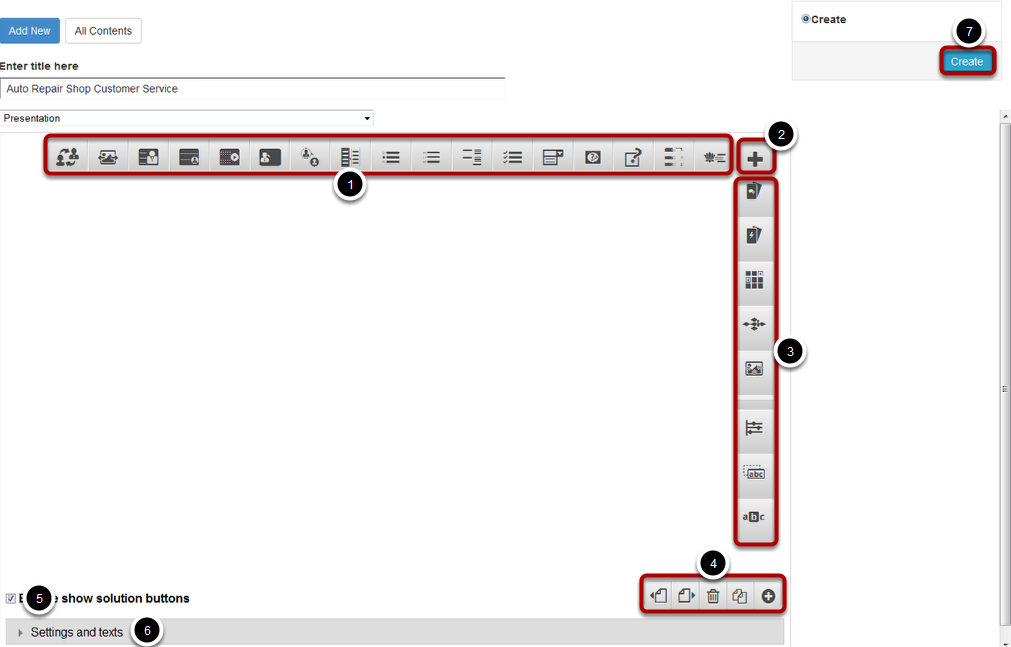
The above page will be common in each lesson you create using the Presentation component. This is the screen where you add components to design your lesson pages and this will be the first slide of this Presentation. On this screen, you can
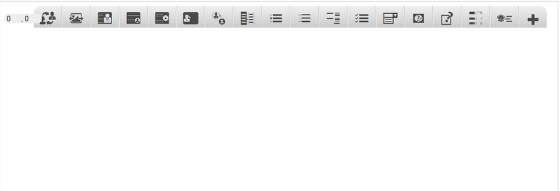
- Add components to the lesson by clicking or dragging and dropping any component from the Components Toolbar [1].
- Click the More elements [2] button to see the second set of components in the Components Toolbar.
- Select any component from the second set of components from the Components Toolbar [3] which appears once you click the More elements button.
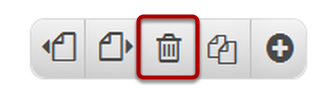
- Add, delete, clone and sort the slides in the presentation using the buttons in the Slides Toolbar [4].
- Enable to show solution buttons for the slides added to the presentation by checking the Enable show solution buttons [5] checkbox.
- Change the overall settings for the slides and components added to the presentation under Settings and texts [6] title.
- Complete creating the Presentation by clicking the Create [7] button.
Step 5: Click on the required Component
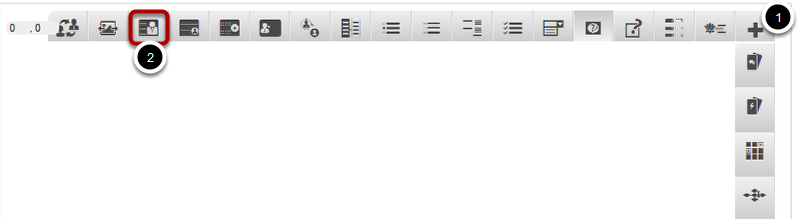
Then click on the component's icon that you want to add to this slide. If the component you are looking for is not found in the horizontal first set of components in the toolbar, then click the More elements [1] button to reveal the vertical second set of components and click the required component. In this case, we select the Text with Image [2] component shown above.
Step 6: Update the Component Page
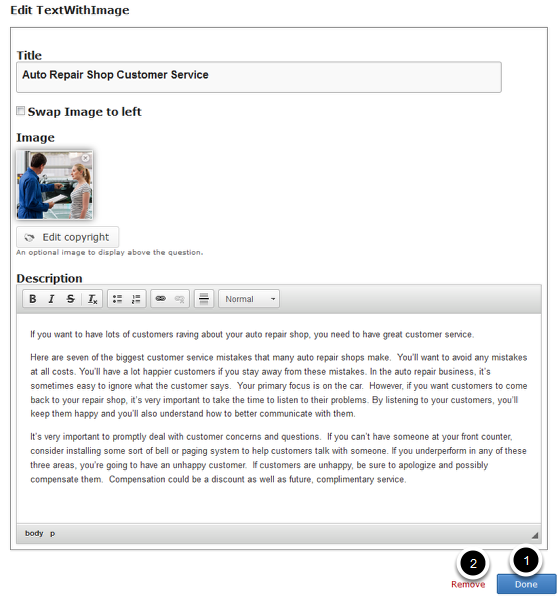
You will see the above screen for the Text with Image component. Update all the necessary fields as shown above and click the Done [1] button. You can also cancel or remove this component by clicking the Remove [2] link.
Step 7: View the Preview Page
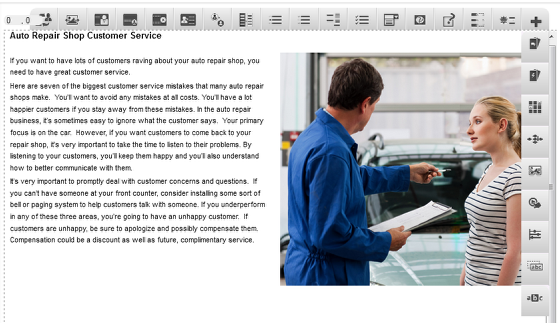
Once you click the Done button, you will be shown a preview of the page you are creating. If you still want to edit it, you can double click on the preview which will lead to the screen shown in step 6.
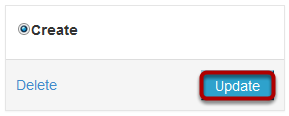
Step 8: Click the Create Button
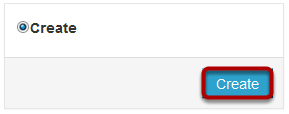
Once you've updated the lesson, you can click the Create button shown above to create the lesson. This button can be found on the top right corner of the page. If you have already created a lesson, and editing it again, you will be shown Update button instead of Create button as shown in the below screen.
Once you click the Create or Update button, you will see the below screen.

You can see the just created or updated lesson as shown in the above screen. You can edit the lesson again by clicking the Edit [1] link shown above. You can also view the lesson in full screen by clicking the Fullscreen [2] button found on the top right corner.
Deleting a Lesson
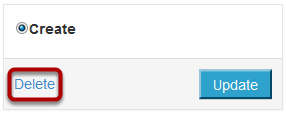
You can also delete an existing lesson by clicking Edit button of the course and then clicking the Delete link shown above. You will see the below prompt window.

Click the OK button to delete the lesson.
Managing Slides with Slides Toolbar

You can add, remove, clone and sort the slides using the Slides Toolbar shown in the above image. You can see this toolbar on the bottom right side of the page once you enter the editing screen for your component. When you create a new Presentation, it will have only one slide. If you want to add more slides, click on the Add new slide button shown above.
You will see another blank slide being added to the Presentation as shown in the above image. If your Presentation has more than one slide, the navigation buttons will appear when you hover the mouse over the bottom side of the page as shown in the below image.

You can easily navigate between the slides using the navigation buttons shown in the above image.
You can also delete a slide by clicking the Remove slide button shown in the above image. You will see the below prompt screen.
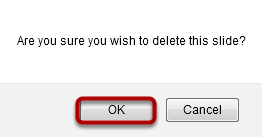
Click the OK button on the above prompt screen, and the current slide will be removed from the presentation. You will be taken to the previous slide.
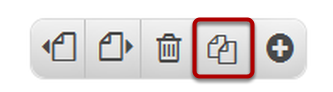
You can also create a duplicate of a slide by clicking the Clone slide shown above. The current slide will be duplicated and you will be taken to the new slide which will appear on the right side of the current slide.
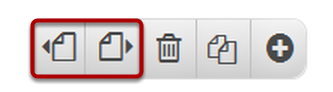
If you have more than one slide in a presentation, you can easily change the order of the slides and move any slide to any location. To move a slide, go the required slide and click Sort slide - left or Sort slide - right buttons to move it to left and right sides respectively. You can click these buttons until the slide is moved to your desired position.
Other Options for the Presentations

You can also check the Enable show solution buttons checkbox found on the button left side of the page. If you check this checkbox, the Show Solution button will be enabled for all the slides you add to the Presentation. By default, this checkbox is checked initially. However, it is advised to keep this checkbox checked and not to change it since this setting will be overridden by the components in the slides.

You can also click the arrow button with Settings and texts shown above title to reveal the options shown in the below image.
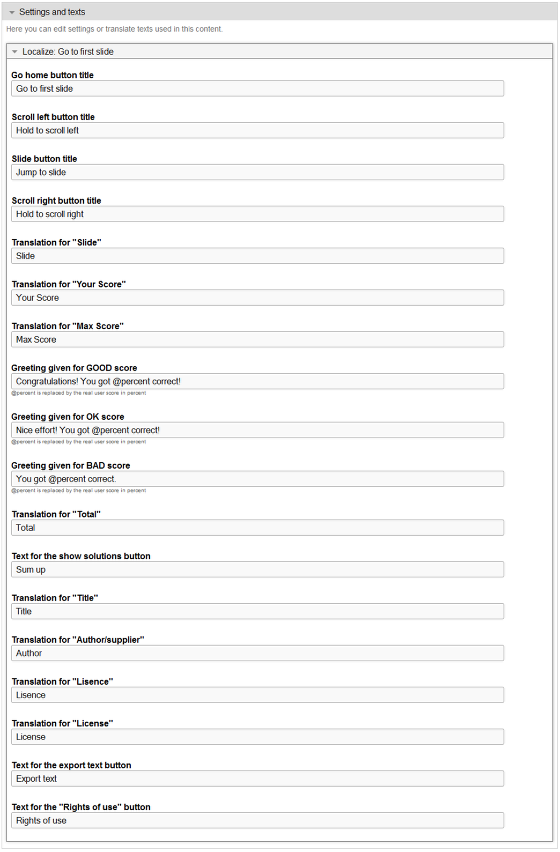
On the above screen, you can change the settings for the texts for all the slides in the Presentation. However, it is advised to change these settings only when necessary, since these settings will be overridden by the other components in the presentation.
Add Lessons to Modules
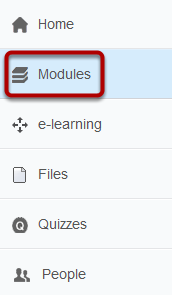
To add your lesson to any modules in your LMS environment, click Modules link on the left side of the screen as shown in the above image. You will see the below screen.
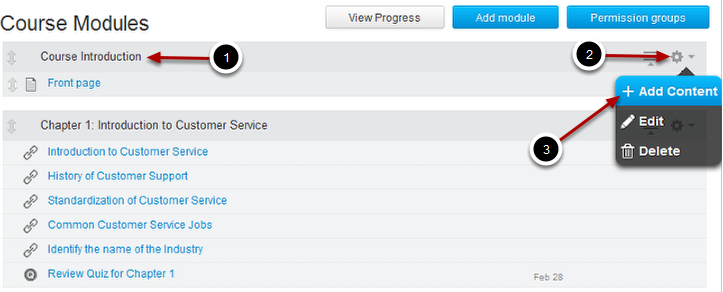
Select the module [1] where you want to add the course. Then click on the Settings [2] icon shown in the above image to reveal the dropdown menu. Then click Add Content [3] option from the dropdown menu. You will see the below screen.
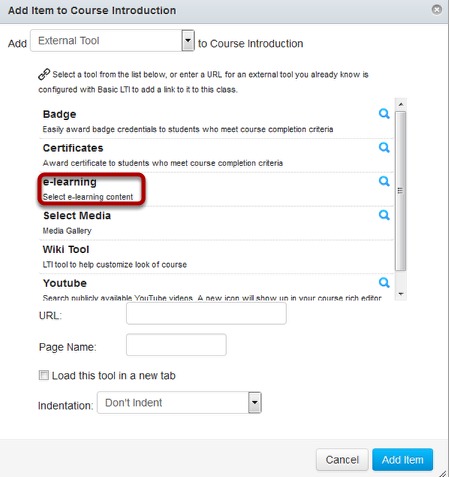
Select e-learning from the above screen. You will be shown a list of all the created lessons as shown in the below image.
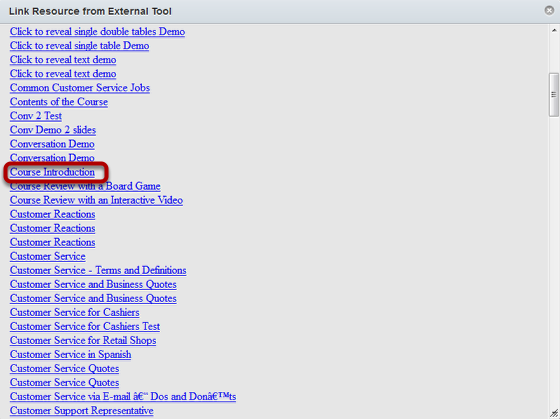
Click on the course you want to add to the module as shown in the above image. You will see the below screen.
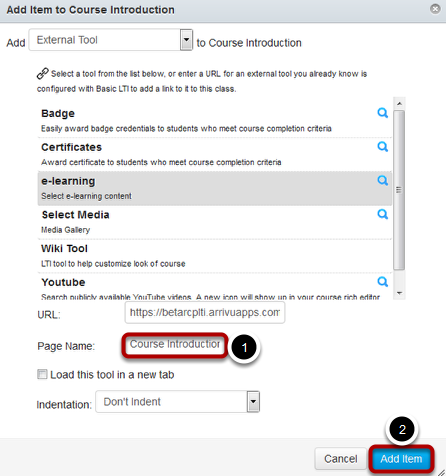
You can change the page's name for the course in the Page Name [1] field shown above. Then click the Add Item [2] button.
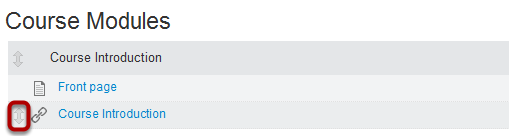
You can see the lesson being added at the bottom of the module as shown in the above image. You can change the position of the lesson in the module by clicking on the Double Headed Arrow button on the left side of the lesson and dragging it to the desired location.
Notes
-
You can add as many slides as possible in a Presentation.
-
You can also add any number of the same component to a presentation. However, it is advised not to use heavy components like Board Games, Interactive Videos and Timeline more than once in a presentation.
-
You must select Presentation from the dropdown box shown in Step 4 and place components into it. If you select any other component directly from this dropdown box, you won’t get the expected results.
-
The navigation buttons will appear only if your Presentation has more than one slide.